Squarespace SEO: How to track anchor links in Google Analytics with Google Tag Manager
I love Google Analytics. It’s been a boon for our personal SEO efforts and the SEO efforts of our clients, so I love finding new and insightful ways of tracking data.
This guide isn’t specific to Squarespace, but you might find it useful if only to see how I set up my anchor links.
Recently, I had a client ask if we could use the “Meet the Team” section on the homepage to track which of their staff and their respective services were generating the most interest; from this information, we could craft blog posts and other content to keep site visitors more engaged.
I thought this was a phenomenal idea, so I set out to find a way to implement it.
It’s worth noting that I’m not going to talk about setting up and installing Google Analytics or Google Tag Manager, as that would make this blog post a mile long.
My assumption is that if you’re reading this blog post, you’re looking to add to your existing setup.
I’m going to use my process for the aforementioned client as the example in this post, so here’s how the Squarespace side of it was set up; If you already have anchor links you want to track then skip ahead.
What’s covered?
Squarespace setup
On the homepage of the client’s site, there is a section for team member profiles. Each profile has a portrait and a short description of their service offering; this is being all fed through a Summary Block.

As well as this, there is a dedicated page on the site which delves into each team member in more detail.
To link each profile up to the corresponding section on the team members page, I first added a piece of code above the name of each team member on the dedicated team page using a Code Block.

Nothing fancy, this code just gives each team member’s section an identifier that an anchor link can connect to.
I then went to the blog page containing the blog posts I was using to display each team member - from where the summary block is pulling the team information.
Under each of the blog post options, there should be an option named “Post Title should link to Source URL”.
This effectively changes the destination from linking back to the related blog post to a custom one.
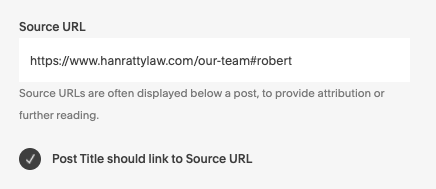
From the image, you can see I appended the “name” value of the prior code to the link to the team members page, starting with a #.
Now whenever someone clicks on the “Robert” profile from the homepage, they’ll be taken to his section on the dedicated team page.
I went through and did this for all of the team members.
At the very least, users would be able to link through to their member of choice from the homepage.
Google Tag Manager setup
Like I mentioned at the start, I’m not going to talk about setting up Google Analytics or Google Tag Manager.
I’m assuming that you’ve already set up an account and container for the website you want to track in Google Tag Manager, and have installed all of the necessary code.
I’m going to be using a bit of Google Tag Manager jargon now, so to save you some confusion:
A trigger is a listener that waits for a certain event and then fires a tag (a link click in our case)
A tag is a snippet of code added to a site that collect information and send them to a third party (Google Analytics in our case)
Variables are the values used in triggers and tags to filter when a specific tag should fire (the URL of the link in our case).
Google Tag Manager doesn’t track clicks by default; this can be validated by clicking on the “Preview” button in the top right.
After you have connected to your site, you will arrive at the “Tag Assistant”.
I strongly encourage you to get into the habit of using the Tag Assistant as it's used to check that your tags have been installed correctly.
But for now, make a note of the events on the left-hand panel.
Click on any element on the page; you should see no new events appearing.

Create a trigger to track all link clicks
So how do we track clicks?
To enable link click tracking, we need to enable a link click trigger.
From Google Tag Manager, go to Triggers > New > Trigger Configuration > Just Links.
Call the trigger “All Clicks” or something similar, leave the default settings for now, and click Save.

Hop back to the Tag Assistant and give it a refresh.
If you click on any of the elements on the page now, you should see a “Link Click” event appearing on the left-hand panel.

Now that we’ve created a generic Link Click trigger and checked that it’s working, we need to enable Click variables to retrieve the actual data we need, and then create precise triggers to fire under specific conditions based on that data.
From Google Tag Manager, go to Variables > Configure.
From there, select all of the Click variables.

Hop back to the Tag Assistant and give it a refresh.
Click on any of the elements on the page now, then click on the “Link Click” event appearing on the left-hand panel of the Tag Assistant, then click on the “Variables” tab.

You should see the Click variables we just enabled with their corresponding values.
We’re now retrieving the data we need to add as conditions for our triggers.
Create a tag to send data to Google Analytics
Now we need to create the tag that will collect the information we need and pass it over to Google Analytics.
From Google Tag Manager, go to Tags > New > Tag Configuration > Google Analytics: Universal Analytics.
For the subsequent options, this is what I named mine, but as we are dealing with a custom event you can name them as you wish.

You will need to add your Google Analytics Tracking ID as a “New Variable...” under the Google Analytics Settings.
After we’ve set up the tag, we need to head back to the trigger that we created earlier and configure it to fire under a certain condition.
Create a trigger to track anchor links only
Once you’re in the Trigger Configuration menu, look for the option named “This trigger fires on” and select “Some Link Clicks”.
A new section will appear underneath, and this is where we specify the condition to fire under.
For the first section, we want to select “Click URL”, the second section should be “contains” and the third section should be the page that contains your anchor links, followed by a #.

Now, whenever someone clicks on a team profile on the homepage, GTM will fire our trigger because they include the string we’ve specified.
Here’s a couple of the links to give you an idea:
https://www.hanrattylaw.com/our-team#robert
https://www.hanrattylaw.com/our-team#isabella
I’d recommend testing this in the Tag Assistant to check that it’s firing correctly. Make sure that it's only firing under the condition that we’ve set; not for all link clicks.
Make sure you submit and publish the changes you’ve made to your container; make sure you’ve given it an apt version name and description.
Google Analytics Setup
It’s worth noting that the data we’re tracking will be available in the event section of your Realtime reports, but it can take up to 24 hours for the results to propagate in the events section of your Behaviour reports.
Now, the idea behind all of this was to create a widget on my Google Analytics dashboard to show which percentage of the team profiles was the highest, and plan an SEO campaign accordingly.
This is the setup I used for my widget, but feel free to experiment and find a way to display the data in a way that makes sense to you.

To give you a little behind the scenes:
This widget is displaying every event sent over from Google Tag Manager and is aggregating them by the event label (which we previously specified as the Click URL) and displaying that as a percentage.
But as I have a few events being sent over from google Tag Manager, I added a filter to display the event labels I was actually after.

As I’ve mentioned, Google Analytics has been a boon for our SEO efforts, and when you compliment that with helpful data from Google Tag Manager, you’re able to generate truly insightful data to improve your SEO and marketing strategies.
Based on this implementation alone, we’ve been able to identify the areas of the industry that are generating the most interest for this time of year, and create an SEO and marketing campaign to capitalise on it.
So it just goes to show how powerful even the most seemingly insignificant data (like a single link click) can be.
I hope you’ve found this useful, and please feel free to leave a comment! :)


Sed purus sem, scelerisque ac rhoncus eget, porttitor nec odio. Lorem ipsum dolor sit amet.